Convert Pic to Green Monochrome Monitor Line Art Effect
Past Ariel Garaza Diaz
There are many means yous tin adjust the color of images in CorelDRAW® Graphics Suite to create duotone and monochrome effects. This tutorial will evidence you some unlike techniques and I will be outlining some of the tools I use, but this is not an exhaustive listing. There are many ways to adapt the color of images in CorelDRAW Graphics Suite and I encourage yous to wait around and experiment with the tools and effects available in the software.
Creating Duotones and Monochrome Images
There are many ways you can suit the color of images in CorelDRAW and Corel PHOTO-Pigment to create duotone and monochrome effects. This tutorial will show y'all some of my preferred techniques and tools including:
- Duotone Mode
- Image Effects Settings
- Color Adjustments in PHOTO-PAINT
- Tone Curve
- Monochrome Images
- PowerTRACE
- Lenses
Click on any of the images below to view full-size.
1 – Duotone Mode
More often than not, duotone images are made by ane or more direct colour tones, such as Pantone inks. The outcome is dissimilar from what you would get with mix of colors (RGB or CMYK).
To commencement, open a photograph or bitmap in CorelDRAW. The original colour fashion of the image does not matter. To bring upwardly the control console become toBitmaps>Mode >Duotone.
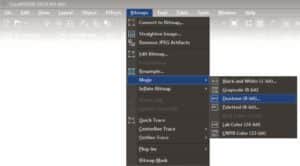
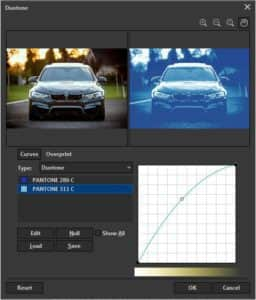
There are four options available in the dialog box, depending on the amount of inks you lot're using:Monotone (ane single ink),Duotone (2 inks),Tritone (iii inks) andQuadtone (iv directly inks).
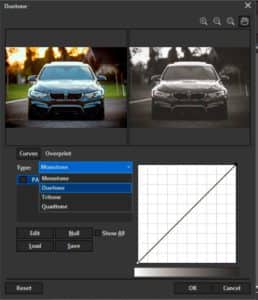
In theType dropdown, selectMonotone, and click theEdit button to modify the colour (past default, Pantone Process Blackness) and choose another color if needed. It is of import to clarify that if an RGB or CMYK color is selected, the program will replace information technology with the closest Pantone colour.
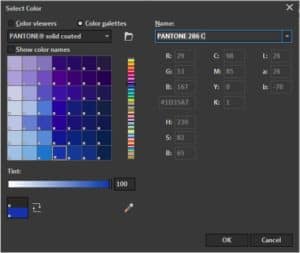
In one case a color has been selected clickOK. Then use the line graph shown in the bottom right to modify the mid-tone bend, making the image lighter or darker.
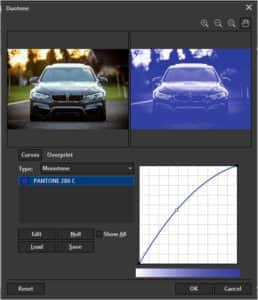
This technique allows you to create a powerful image using a single ink. Delight note that many Pantone inks have a gloss or tone that cannot be achieved in RGB or CMYK.
The advantage of this is that information technology tin pb to significant cost savings (one ink or two instead of four) and in some cases, simplifies the printing process (for example, in screen printing). Retrieve that if you add a Duotone to a job in CMYK, it could increase the price, since you are adding boosted inks.

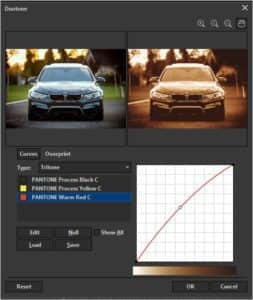
Under theType dropdown selectDuotone, this volition have two ink colors and mix them.
Don't forget that you're mixing inks with this process and then the effect volition exist different from mixing RGB or CMYK colors. These are opaque inks which are difficult to mix then they overlap each other.
This is why you'll get better results with colors in the aforementioned range (every bit seen in the image below), than if we used contrary tones like bluish and yellow for example.
This technique will create greater tonal richness in your image than a single ink.

You can layer iii or four shades nether theType dropdown and selectTritoneor Quadtone. This will increase the chances of combining colors.
NOTE: Since spot colors are not rendered in the same way every bit RGB or CMYK, they practise non grade the same intermediate tones. Significant the image will not have its natural colors.

ii – Image Effects Settings
You tin can manually create a similar look by combining effects. Let's first look at the furnishings constitute in both CorelDRAW and PHOTO-PAINT.
For the purpose of this tutorial, it'due south best to offset with a gray image and then apply these color effects, especially if you're using multiple effects on the same epitome.
If your image is in full color, you can make it look grey in CorelDRAW by going toEffects >Adjust >Desaturate.
Now that your image is in grayscale make certain it is RGB. To exercise that in CorelDRAW selectBitmap >Mode >RGB Color. If the RGB color option is grayed out then your paradigm is already RGB.
Even if y'all are going to work in CMYK, it's best to first catechumen your image to RGB so the greyness color is equanimous of all the colors. Otherwise, when you go from grayscale to CMYK the information would only exist in the Black channel.
Note: By editing the prototype this way, the image will be printed as CMYK, not as direct inks. Although visually the result may appear similar a Duotone, neither the way of producing it nor the way of printing are the same.
At present that you've prepped your image you tin use the post-obit tools for color changes.
Color residual
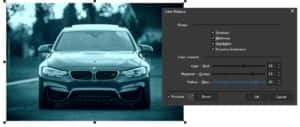
This is a not bad tool to utilize if yous need a more than detailed adjustment, especially to differentiate brighter areas from darker ones. To bring upwardly theColor Balance console in CorelDRAW get toEffects >Suit >Color residual or in Photo-Paint get toAdjust >Color residue.
In this panel, use the check boxes netherRange to select the prototype areas you want to manipulate. You have the ability to select one element or all at the same time. To change the color limerick of the image simply slide the controls until to achieve the desired tonality.
Colorize
In CorelDRAW or PHOTO-Pigment you lot can pull upwardly theColorize console by going toEffects >Camera >Colorize. Here yous tin can suit the hue and saturation to achieve your desired coloring effect.

Color Filter
In CorelDRAW or Photograph-Pigment selectEffects >Camera >Photograph filter. With this effect you can simulate the result of placing a colored filter in front of a camera lens. You can choose the color of the filter and and so adjust the color density and luminosity.

Sepia Toning
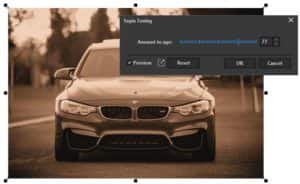
The Sepia filter is a great mode to create an older look on an epitome. In either CorelDRAW or PHOTO-Paint go toFurnishings >Camera >Sepia toning to pull upwards the console. Employ the slider to control how onetime you desire the image to look.
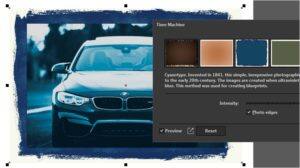
Fourth dimension Motorcar
In CorelDRAW or Photo-PAINT go toEffects >Photographic camera >Time Machine. Hither you'll observe a wide spectrum of impressive furnishings, including photograph edges. This is a peachy place to explore and discover the options and combinations of each effect.
TIP: If you uncheckPhoto edges under theIntensity slider it will remove the edges and utilize the effect across the whole image.
3 – Color Adjustments in PHOTO-PAINT
These are bully effects that are only bachelor in PHOTO-PAINT.
TIP: A quick way to edit an paradigm from CorelDRAW is to right-click on the image then selectEdit Prototype, or you tin can open up the image directly in Photo-PAINT as an contained application. The reward of doing it from CorelDRAW is that the epitome will update automatically after editing is consummate.
PHOTO-PAINT is a powerful plan with many options, this tutorial will but focus on a few options. You can view other Photo-PAINT tutorials here.
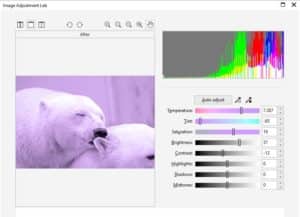
Image Adjustment Lab
This powerful tool acts like a control panel where yous can access many sliders to adjust the color of a photograph. Information technology is very intuitive and has a preview, making information technology easy to adjust the values and see the results.
To open theImage Aligning Lab in PHOTO-PAINT selectConform >Image Aligning Lab. TheTemperature slider allows you to prepare the color between warm tones (such as ruby, orange, yellow) or common cold (such as bluish or purple). TheTint slider allows you lot to make a more than adapted choice of the tone, choosing between "more magenta" or "greener". TheSaturation slider adjusts the intensity of the colors, making colors more than intense or more muted (a very depression value turns information technology into gray). The remaining sliders likeBrightness,Contrast, etc. adjust the quality of our prototype, achieving a professional outcome in just a few steps.
Grayscale
TheGrayscale filter is a great way to change an prototype to black and white and tint an prototype without changing the color fashion. In Photo-Pigment open your paradigm and become toAdjust >Grayscale. A command console will pop upwardly and y'all'll observe that you image is automatically inverse to black and white. Check off theTint box to unlock theHue andSaturation aligning confined.

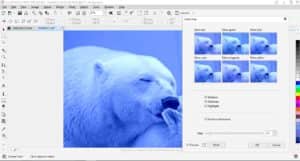
Color Hue
TheColour Hue tool is a great visual fashion to gradually add color. To open up the panel in Photo-Paint go toAdjust >Color Hue. But by clicking on the thumbnail you lot tin add more red, blue or green, or cyan, magenta and yellow, etc. This tool will edit the image as a whole or work the highlights, mid-tones and shadows separately.
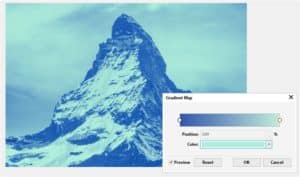
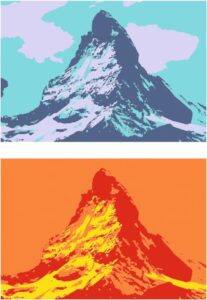
Gradient Map
This tool will convert the colors of an epitome into the mixture of two tones.
In PHOTO-PAINT go toObject >Create >New Lens. In theNew Lens console in theCategories column selectColor Transform, then under theEffects column selectGradient Map and clickOK.
On theSlope Map panel click on the circles to choose your initial and terminal color tones, and the tool will generate the gradient.
NOTE: The prototype is all the same in RGB or CMYK, information technology does not alter to directly inks like in theDuotone tool mentioned above, merely visually it is composed of the 2 chosen tones.
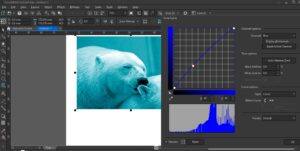
4 – Tone Curve
This is one of my favorite tools, because it has much more artistic freedom then the others. Information technology allows you to manipulate the values of each channel separately.
This tool is bachelor in both CorelDRAW and Photo-PAINT. To bring upward the console in CorelDRAW go toFurnishings >Adjust >Tone Curve. To bring up the panel in Photo-PAINT become toAdjust >Tone Curve.
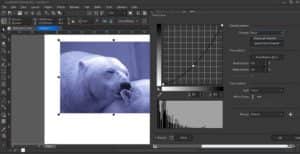
Yous will see a line graph that can be curved and manipulated to obtain variations in tones. If you're working in an RGB file, yous will see 4 options in theChannels dropdown that tin exist modified until you reach your desired tone.
For a CMYK file (for press) the manipulation is the same, merely there will be fiveAqueduct options instead of four.
NOTE: In both cases at that place is a gently curved central expanse, and the end (the lighter and darker colors). That manner we preserve the tonality of the original image (unless, of course, more drastic effects are desired).
v – Monochrome Images
This is probably one of the oldest and most well-known effects. This issue applies color to a monochrome image as if it were a vector, with make full and outline. It is also very simple and fast, but every bit with the others, the result depends on the paradigm. That is why this article shows multiple options, in social club to choose the one that best fit for the projection.
The first stride is to catechumen the prototype to monochrome. In CorelDRAW go toBitmaps >Fashion >Black and White. In theConvert to 1 fleck panel you select aConversion method that'due south the best fit for your project with the dropdown. Although there are several options bachelor for this example I will utiliseLine Art, but any of the other options can be used.

At present select the whole paradigm and select a new background color (originally white) by left-clicking on theColor palette. To select an outline color right-click on theColour palette.
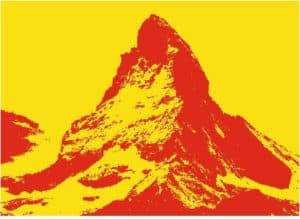
6 – PowerTRACE
This tool is similar to the previous one, but with more options and the ability to convert your bitmap paradigm to a vector.
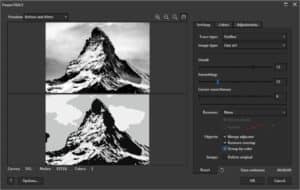
To bring upward thePowerTRACE console in CorelDRAW select the photograph, and in theBackdrop bar select theTrace Bitmap >Outline Trace >Line Art (you can also choose it by right-clicking on the image and going toOutline Trace > Line Fine art).
In the dialog box, check the boxGroup by color, then in theColors tab enter a value for theNumber of Colors you want, for this example I entered three. Once y'all have that entered, clickOK.
At present you'll notice that in yourObjects docker you have a group created with the aforementioned number of colors yous chose in thePowerTRACE console. To change the color of an object grouping, select the group in theObjects docker and click on a colour on theColor palette.
This method gives you more creative freedom, since you have the pick to select individual objects, delete them or modify their color. Yous tin also choseRemove groundwork in thePowerTRACE panel to take a transparent background.
7 – Lenses
TheLens docker is a keen tool that applies effects to the advent of an object without actually changing the object. Before you open up theLens docker you need to create an object over your image to utilize the lens. For this tutorial I'yard going to speedily draw a circle in CorelDRAW over the image.
Now with your object selected open theLens docker in past going toEffects >Lens or employ the keyboard shortcutAlt + F3. In that location are 2 lenses I will highlight for this tutorial:Custom Color Map andOestrus Map.
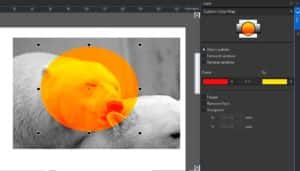
Custom Colour Map
TheCustom Color Map lens in CorelDRAW allows you to create a lens based on two colors giving you a await very like to the Duotone effect described earlier in the tutorial, only it keeps the file as RGB or CMYK. Use the dropdown at the top of the lens docker to selectCustom Color Map. Here yous tin can select custom colors under theFrom andTo dropdowns. Different furnishings can exist achieved by inverting the colors (click the < > button) or selectingForward rainbow orReverse rainbow options.
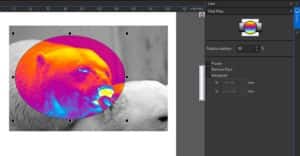
Heat Map
Although this is non a duotone or monochrome effect, I wanted to mention this interesting result. TheOestrus Map lens simulates a thermal or ultraviolet imaging camera. To see this result, selectHeat Map in the dropdown at the pinnacle of theLens docker. Y'all can change the percentage of thePalette rotation for dissimilar results and color limerick. This result is especially nifty for pop-fine art or vintage manner images, such every bit a disco style from the '80s.
Equally nosotros tin see, there is a wide range of options to color our images and requite them a new life or different furnishings. These are just some examples, which I invite y'all to use and explore your imagination and inventiveness with countless combinations. CorelDRAW Graphics Suite opens a world full of color and art for your images.
We hope yous found this tutorial helpful and nosotros would honey to hear your feedback in the Comments section beneath. And don't forget to visit our galleries and prove usa what yous've learned by sharing your photos, videos and artistic projects with us.
burmeisteroura1948.blogspot.com
Source: https://learn.corel.com/tutorials/creating-duotones-and-monochrome-images-in-coreldraw-and-photo-paint/
0 Response to "Convert Pic to Green Monochrome Monitor Line Art Effect"
Postar um comentário